

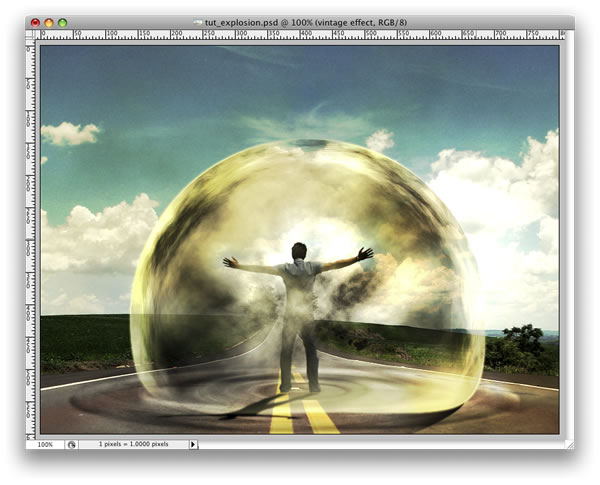
Vamos a utilizar las imágenes y los filtros para producir este efecto de onda de explosión.
Aunque puede parecer una difícil tutorial, es realmente difícil que no.
Paso 1
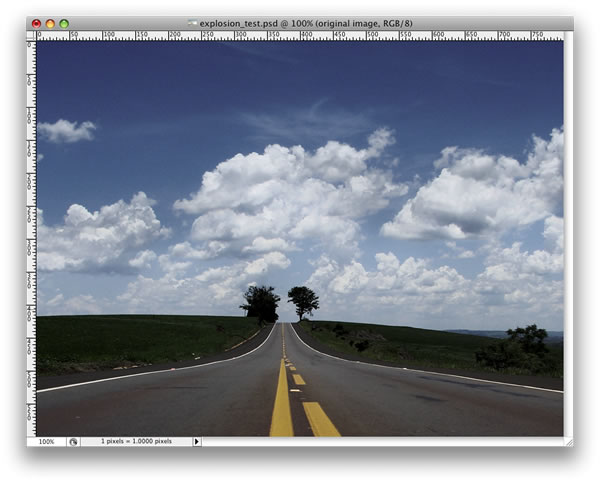
Abre un nuevo documento. He utilizado 800x600px.Busque una foto de carreteras en Internet. colocar la foto en su documento.
Paso 2
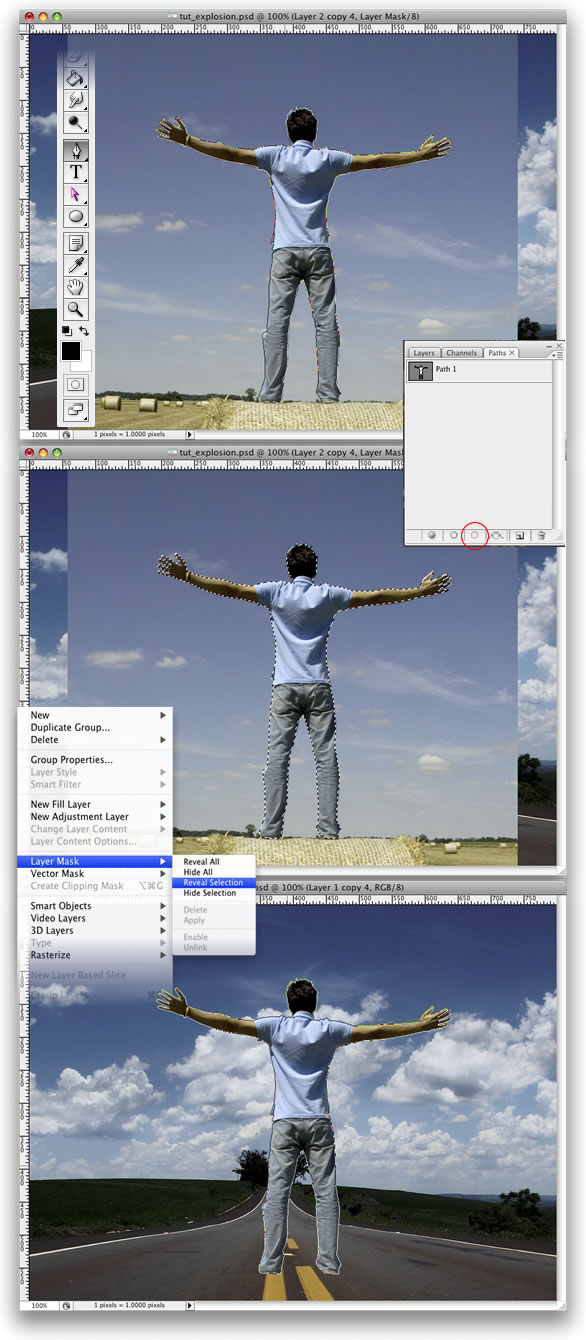
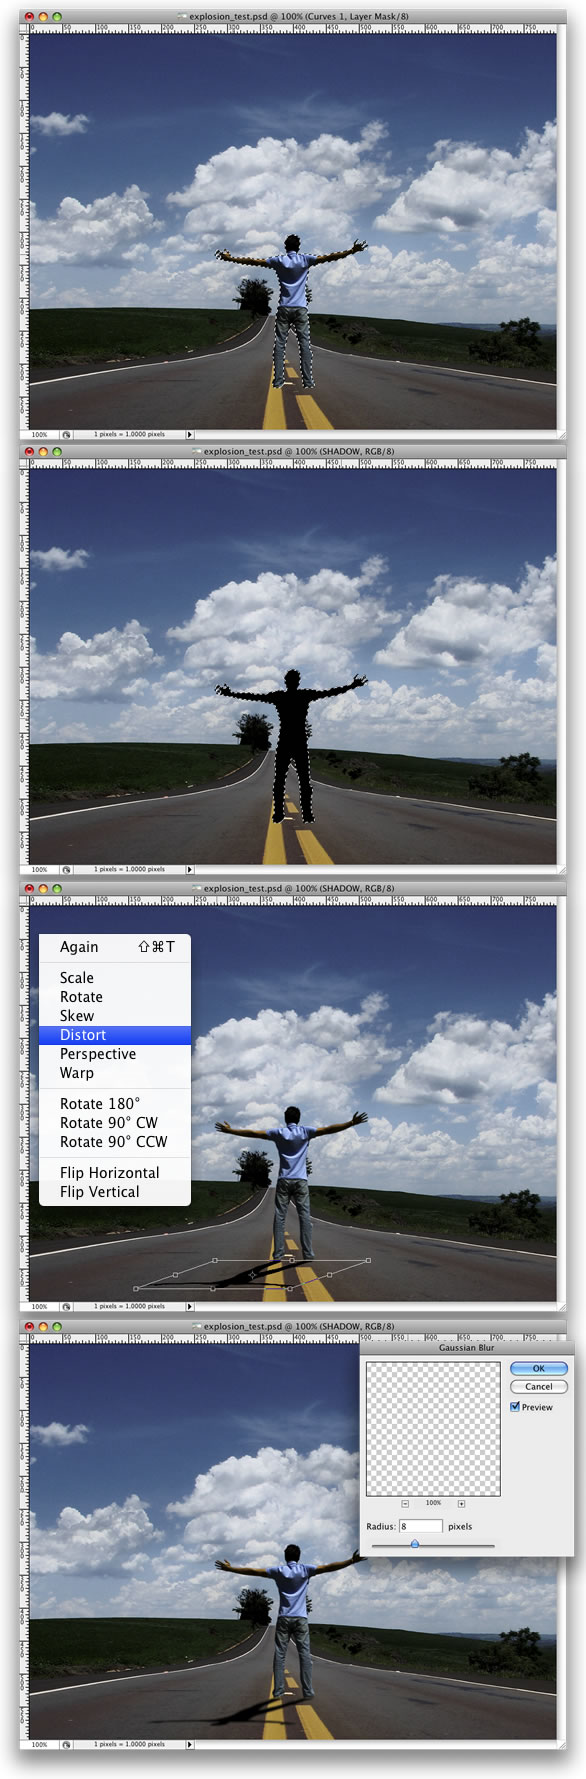
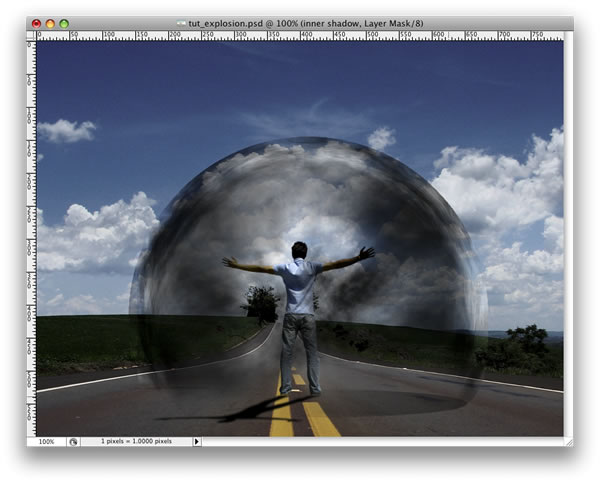
Ahora tenemos una foto de una persona. La he usado se puede encontrar aqui. Una vez que tengas tu foto, es el momento de extraer el chico del fondo. El uso de la herramienta Pluma (P) crear una ruta como en la imagen que aparece a continuación. Después de que vaya a la Paleta de Caminos y crear una selección de ese camino. A continuación, ir a capa> Añadir Mascara de capa> descubrir todas Por último, esta capa llamada "dude".
Step 3 Paso 3
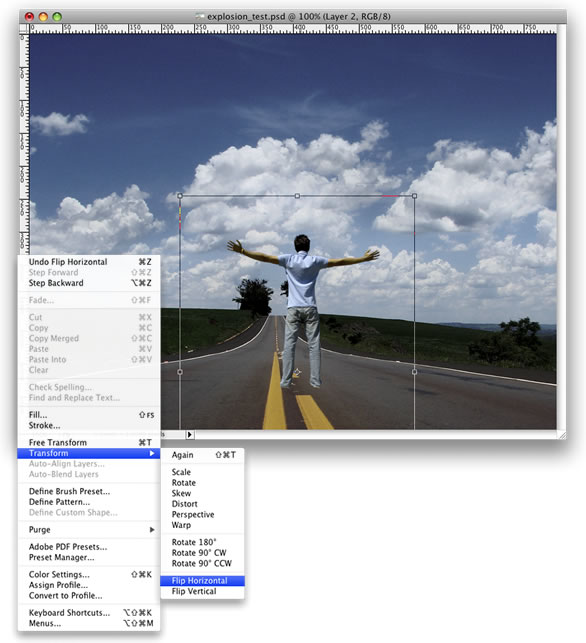
Go to Edit>Transform>Scale and reduce the size of the guy. Volver a Edición> Transformar> Escala y reducir el tamaño del tipo. Then go to Edit>Transform>Flip Horizontal. A continuación, ir a Edición> Transformar> Voltear horizontal. We do that to match the light direction. Eso es lo que hacemos para que coincida con la dirección de la luz.
Step 4 Paso 4
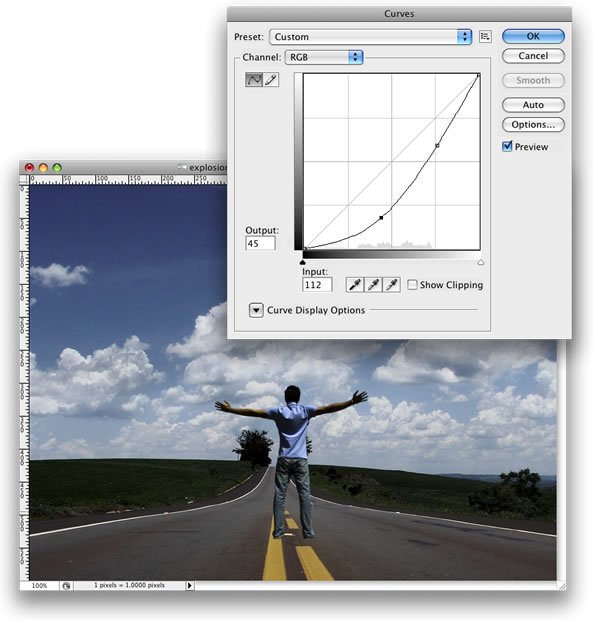
Go to Image>Adjustments>Curves. Ir a Imagen> Ajustes> Curvas. The idea here is to darken the guy a little bit so he will fit better with the background. La idea aquí es para oscurecer el chico un poco por lo que encajará mejor con el fondo. Use the image below as a reference. Utilice la imagen que aparece a continuación como una referencia.
Step 5 Paso 5
Holding Cmd/Ctrl click on the mask thumb of the "dude" layer. Holding Cmd / Ctrl + clic en la máscara del pulgar "dude" capa. That will create a marquee selection of the guy. Esto creará una marquesina de la selección chico. After that create a new layer. Después de que crear una nueva capa. Rename it to "shadow" and fill it with black. Cambiar el nombre a "sombra" y llenarlo con negro. Then go to Edit>Transform>Distort and move the vertices to make the shadow in perspective. A continuación, ir a Edición> Transformar> distorsionar y mover los vértices a hacer la sombra en perspectiva. The last thing here is go to Filter>Blur>Gaussian Blur. La última cosa que aquí es ir a Filter> Blur> Gaussian Blur.
Step 6 Paso 6
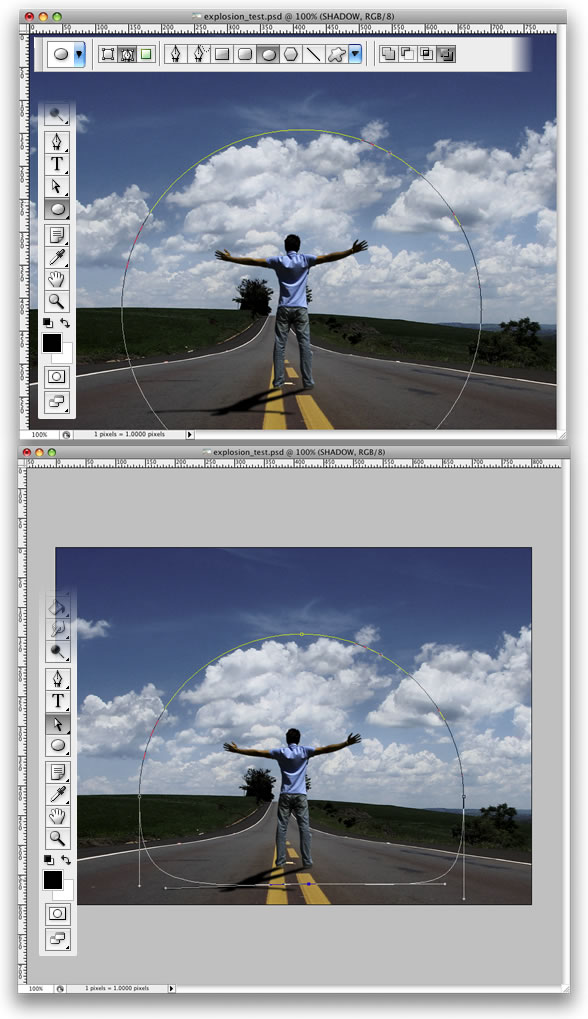
Grab the Ellipse Tool(U). Agarra la Herramienta Elipse (U). Select Paths instead of Shape Layer. Seleccione Caminos en lugar de Forma Capa. Create a Circle, like the image below. Crear un círculo, al igual que la imagen que aparece a continuación. After that grab the Direct Selection Tool(A) and adjust the bottom of the circle. Después de que agarrar la Herramienta de selección directa (A) y ajustar la parte inferior del círculo.
Step 7 Paso 7
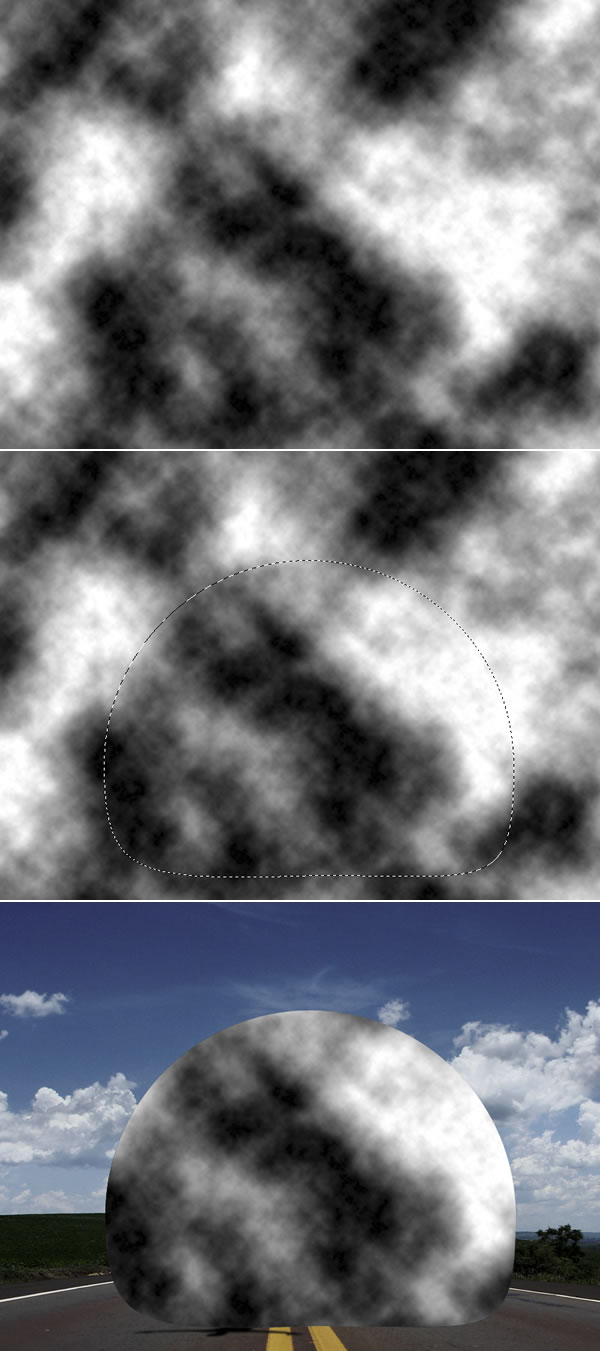
Create a new layer. Crear una nueva capa. Rename it to "clouds." Cambiar el nombre a "nubes". Then go to Filter>Render>Clouds. Luego vaya a Filter> Render> Nubes. While holding Alt, click on Clouds. Mientras mantiene Alt, haga clic en las nubes. After that go to the Path's Palette and create a selection from the path and mask the layer. Después de que vaya a la Ruta de la paleta y la creación de una selección de la ruta y la máscara de capa.
Tip: As you will be using the Render>Clouds, you will probably need to apply the filter several times until you got the clouds just right. Sugerencia: Como usted va a utilizar el Render> Nubes, probablemente necesidad de aplicar el filtro varias veces hasta que recibió las nubes justo a la derecha. Keep working with it until the light and dark areas are in a good position. Seguir trabajando con él hasta que las zonas oscuras y claras se encuentran en una buena posición.
Step 8 Paso 8
Go to Filter>Liquefy. Ir a Filtro> licuar. In the Liquefy Dialog Box select the Bloat Tool (B). En licuar el Cuadro de diálogo, seleccione la herramienta hinchan (B). Then for the settings use: Brush Size 550, Brush Density 100, Brush Pressure 100, Brush Rate 60, and Turbulent Jitter 75. Luego, para la configuración de uso: Tamaño 550 Brush, Brush Densidad 100, Brush Presión 100, Brush Tasa 60, turbulenta y Jitter 75.
Then select the Show Backdrop Option. A continuación, seleccione la opción Mostrar el telón de fondo. That will allow you to see the clouds and the background. Eso le permitirá ver las nubes y el fondo. It will be necessary to use the Bloat Tool in the right place. Será necesario utilizar la herramienta hinchan en el lugar correcto. Click a few times and deselect the Show Backdrop. Haga clic en un par de veces y anule la selección de Mostrar el telón de fondo. Then you will see the effect and will be able to repeat it more times in the correct place. Luego, usted verá el efecto y será capaz de repetir más veces en el lugar correcto.

Step 9 Paso 9
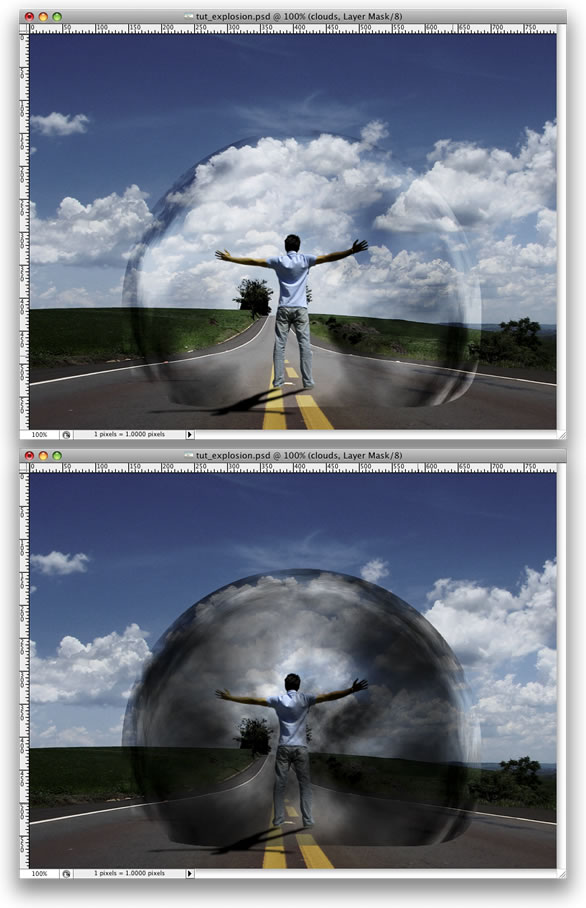
Change the Blend Mode of the cloud layer to Soft Light. Cambie el modo de mezcla de la capa de nubes a Soft Light. Then create another layer and rename it to "Clouds 2" and repeat Steps 7 and 8. A continuación, cree otra capa y cambiar el nombre a "Nubes 2" y repita los pasos 7 y 8. We will need another cloud to make it more turbulent. Tendremos otra nube para que sea más turbulento. This time, however, use Multiply for the Blend Mode. Esta vez, sin embargo, el uso de Multiplicar la Blend Mode.
After that, create yet another layer. Después de eso, crear una nueva capa. Rename it to "Clouds 3" and repeat Steps 7 and 8. Cambiar el nombre a "Nubes 3" y repita los pasos 7 y 8. For this layer use Color Dodge for the Blend Mode. Para utilizar esta capa de color para el Dodge Blend Mode. The last thing here is with the Eraser Tool (E) delete some parts. La última cosa que aquí es con la herramienta Borrador (E) suprimir algunas partes. This layer is used to give highlights to the clouds. Esta capa se utiliza para dar más destacados a las nubes.
Step 10 Paso 10
Group the "Clouds 3" layer and go to Layer>Layer Mask>Reveal All. El Grupo "Nubes 3" capa e ir a Capa> máscara de capa> revelar todos. After that, select the Brush Tool (B), give it a black color, and mask some parts of the clouds that are close to the ground. Después de eso, seleccionar la herramienta Pincel (B), le dan un color negro, máscara y algunas partes de las nubes que están cerca de la tierra.

Step 11 Paso 11
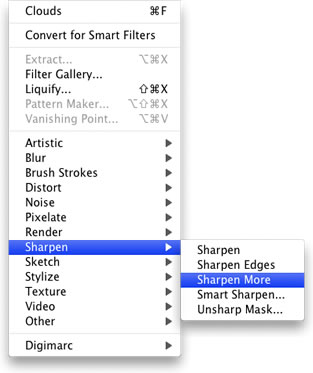
Select the "Clouds" layer and go to Filter>Sharpen>Sharpen More. Seleccione la opción "Nubes" capa e ir a Filtro> Enfocar> Enfocar Más. Then repeat this Sharpen filter on Clouds 2 and 3 layers. Luego repita este filtro de nitidez en las nubes 2 y 3 capas.
Step 12 Paso 12
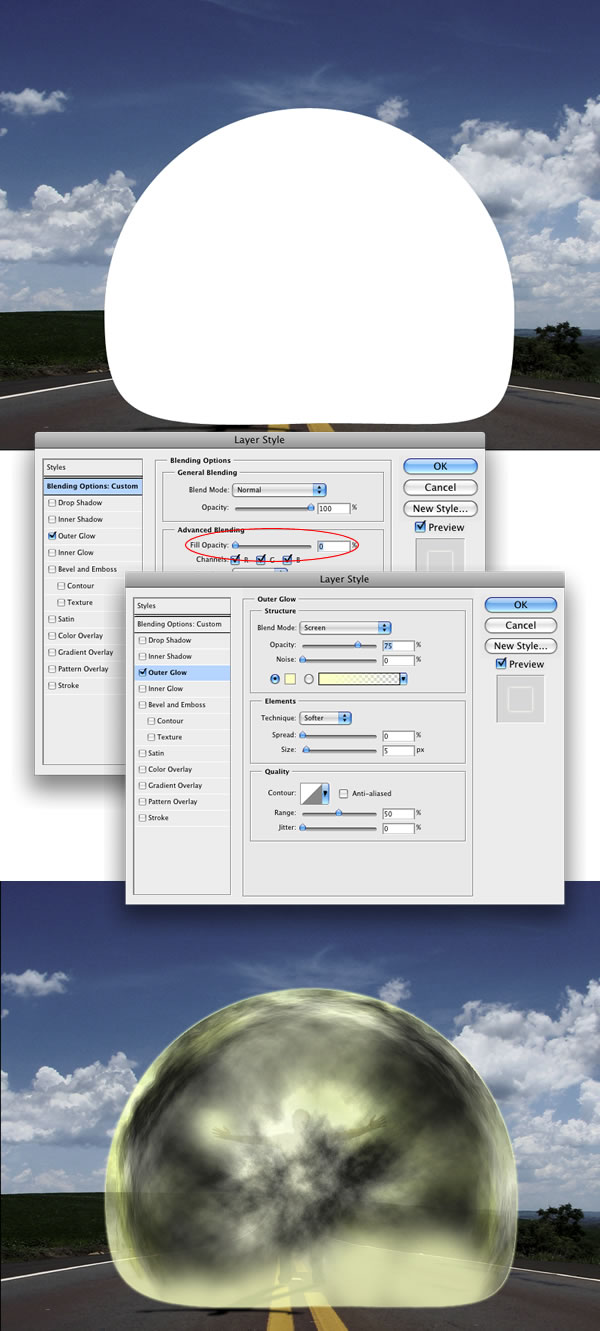
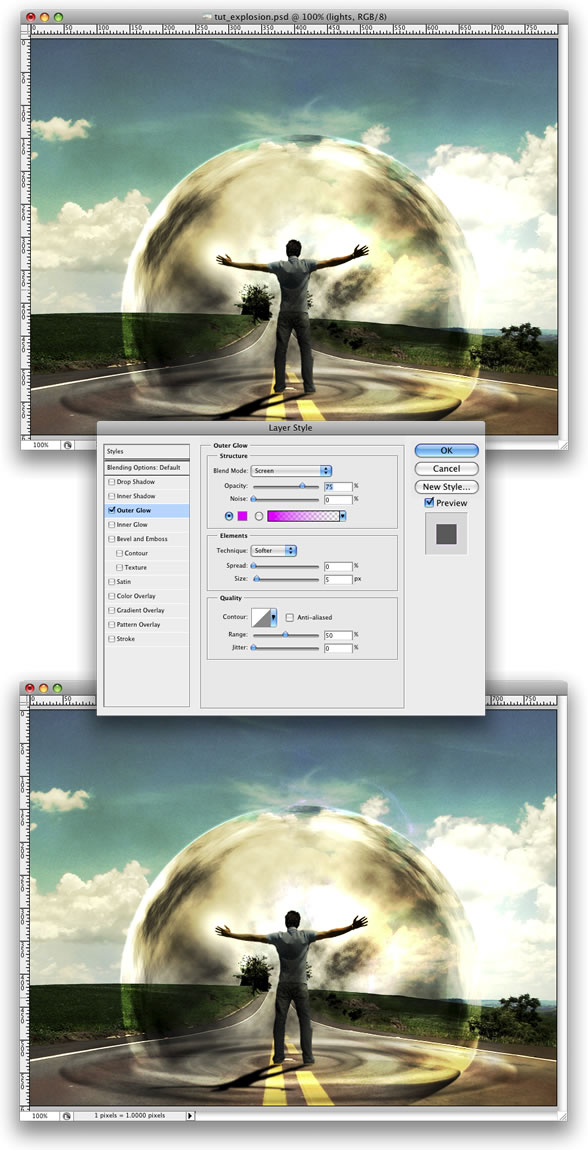
Create a new layer. Crear una nueva capa. Rename it to "Glow." Cambiar el nombre a "Glow". Fill it with white and go to the Path Palette. Rellenar con blanco e ir a la Ruta de Paleta. Create a selection from the clouds path as we did in Step 9. Crear una selección de las nubes camino como lo hicimos en el paso 9. Then mask the layer. Luego máscara de la capa.
After that go to Layer>Layer Style>Outer Glow. Después de que vaya a Capa> Estilo de capa> Resplandor exterior. Use the default settings. Use la configuración predeterminada. Then go to Layer>Layer Style>Create Layer. A continuación, ir a Capa> Estilo de Capa> Crear Capa. This command will create another layer from the Outer Glow. Este comando va a crear otra capa de la Ultraterrestre Glow. You can delete the white layer and leave just the Outer Glow layer. Puede eliminar la capa blanca y dejar sólo la capa exterior Glow.
Step 13 Paso 13
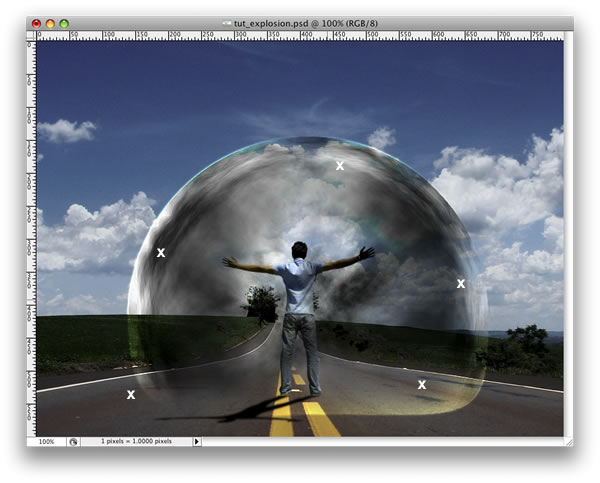
Create a folder called "Lights." Crear una carpeta llamada "Luces". Move the "Glow" layer to this folder. Mueva el "Glow" capa a esta carpeta. Next select the "Glow" layer. A continuación, seleccione la opción "Glow" capa. Then go to Layer>Layer Mask>Reveal All. A continuación, ir a Layer> Layer Mask> revelar todos. Then select the Brush Tool, black for the color, and start masking the glow. A continuación, seleccione la herramienta Pincel, negro para el color y empieza a ocultar el brillo. We need just the outline; however, some bright spots in the middle will give a nice result. Sólo necesitamos el esquema, sin embargo, algunos puntos brillantes en el centro dará un buen resultado.
Step 14 Paso 14
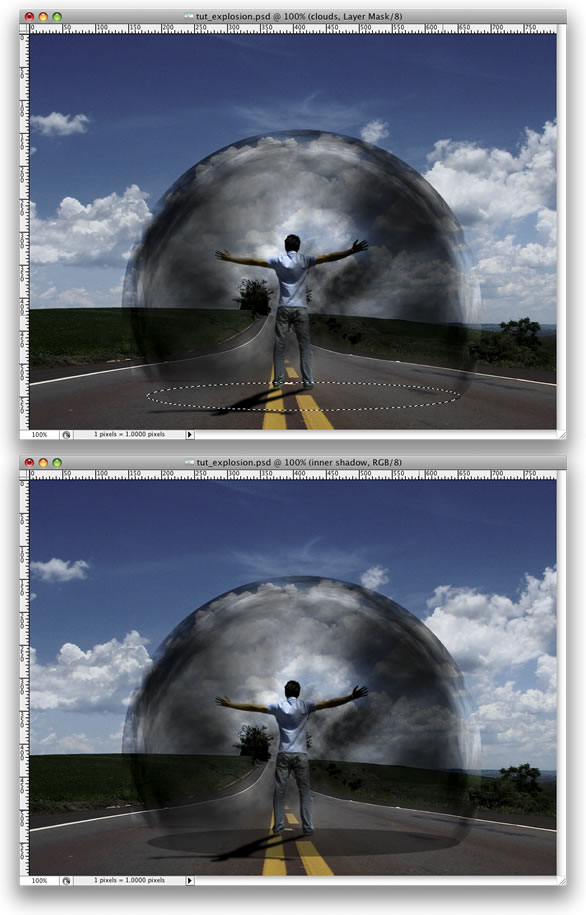
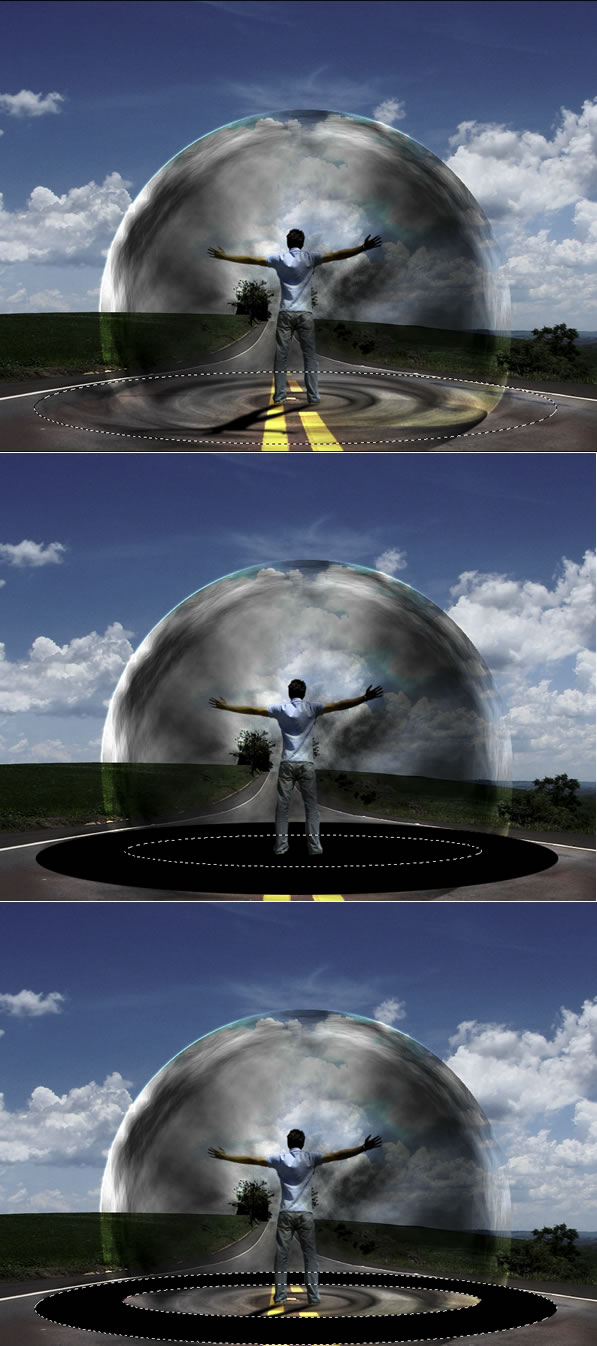
Create a new layer beneath the clouds group. Crear una nueva capa debajo de las nubes. Using the Elliptical Marquee Tool create a selection like the image below. El uso de la Elíptica Marquee Tool crear una selección como la imagen que aparece a continuación. Fill the layer with black and use 40% Opacity. Rellenar con la capa negro y el uso del 40% de Opacidad.
Step 15 Paso 15
Go to Layer>Layer Mask>Reveal All. Ir a Capa> máscara de capa> revelar todos. After that select the Gradient Tool(G) and use a black and white gradient. Después de que seleccione la herramienta de degradado (G) y utiliza un blanco y negro degradado. Then mask the layer, like in the image below. Luego máscara de la capa, al igual que en la imagen que aparece a continuación.
Step 16 Paso 16
Duplicate the layer and go to Layer>Layer Mask>Apply. Duplicar la capa e ir a Capa> máscara de capa> Aplicar. Then go to Edit>Transform>Distort. A continuación, ir a Edición> Transformar> distorsionar. Repeat the same thing we did for the shadow of the guy on this layer. Repita lo mismo que hicimos para la sombra del hombre en esta capa. Group these two layers and rename the group to "Shadows." Grupo de estas dos capas y cambiar el nombre del grupo de "Sombras".
Step 17 Paso 17
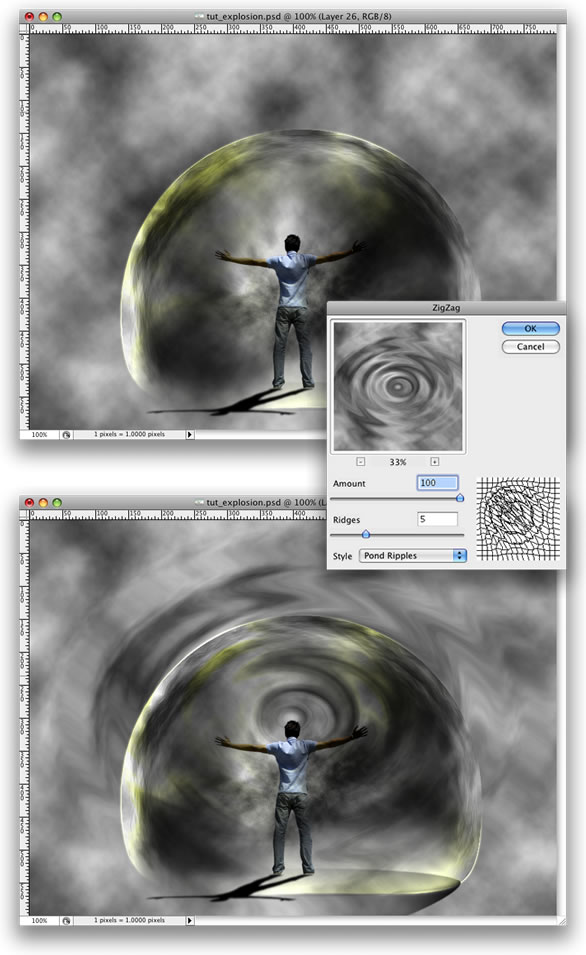
Create a new layer right above the road photo. Crear una nueva capa justo encima de la carretera foto. Go to Filter>Render>Clouds. Volver a Filter> Render> Nubes. Then go to Filter>Distort>ZigZag. A continuación, ir a Filtro> distorsionar> zigzag. Use 100 for the Amount and 5 for the Ridges. Use 100 por el importe y 5 para las Cordilleras. For the Style use Pond Ripples. Para el uso Estilo Pond Ripples.
Step 18 Paso 18
Now go to Edit>Transform>Distort. Ahora vamos a Edición> Transformar> distorsionar. Distort the layer until you get the right perspective. Distorsionar la capa hasta que llegue la perspectiva correcta. After that, change the Blend Mode to Overlay. Después de eso, cambiar la mezcla a modo de superposición. Again, as we are using Render Clouds, the results may vary so you might need to erase some parts to make it more realistic. Una vez más, como estamos usando Render Nubes, los resultados pueden variar de manera usted puede ser que necesite para borrar algunas partes para hacerlo más realista.
Step 19 Paso 19
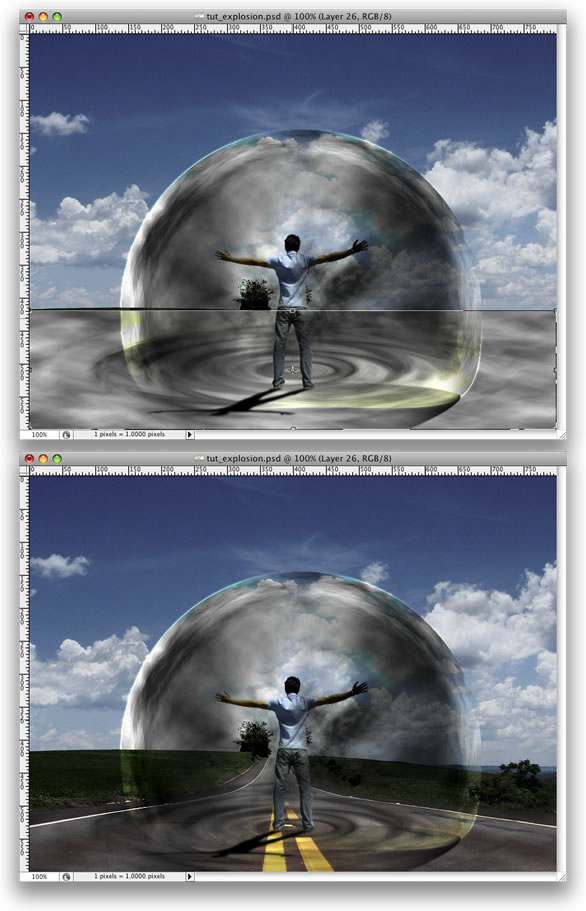
Create an Elliptical Selection like the image below. Crear un Elíptica selección como la imagen que aparece a continuación. Then fill it with black. Luego, llenarlo con negro. After that, create another Elliptical Selection, but smaller. Después de eso, crear otra Elíptica Selección, pero más pequeños. Then delete that part of the layer. A continuación, eliminar esa parte de la capa. With the Magic Wand Tool(W) select the black part of the layer. Con la herramienta Magic Wand (W), seleccione el negro parte de la capa.
Step 20 Paso 20
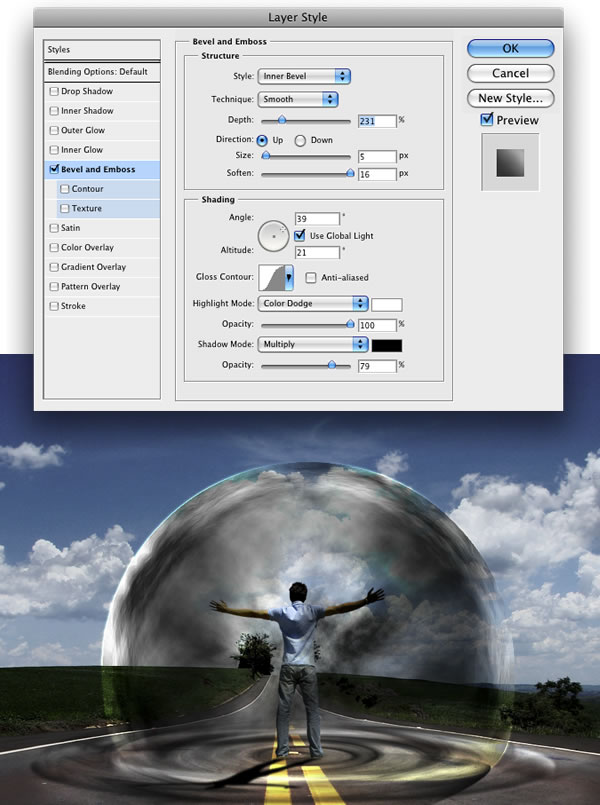
Duplicate the road's layer and select it. Duplicar la hoja de capa y seleccionarlo. Make sure that you still have the Marquee Selection from the Step 19. Asegúrese de que usted todavía tiene el Marquee de selección de la Etapa 19. Then go to Layer>Layer Mask>Reveal Selection. A continuación, ir a Layer> Layer Mask> revelan selección. You can delete the black ellipse layer from the Step 19 or just hide it. Puede eliminar la elipse negro de la capa Paso 19 o simplemente ocultar.
Go to Layer>Layer Styles>Bevel and Emboss. Ir a Capa> Estilos de capa> Bisel y Emboss. This is another way to create the ripple effect. Esta es otra manera de crear el efecto de onda. You could use Displace as well. Se puede usar Desplazar también.
Step 21 Paso 21
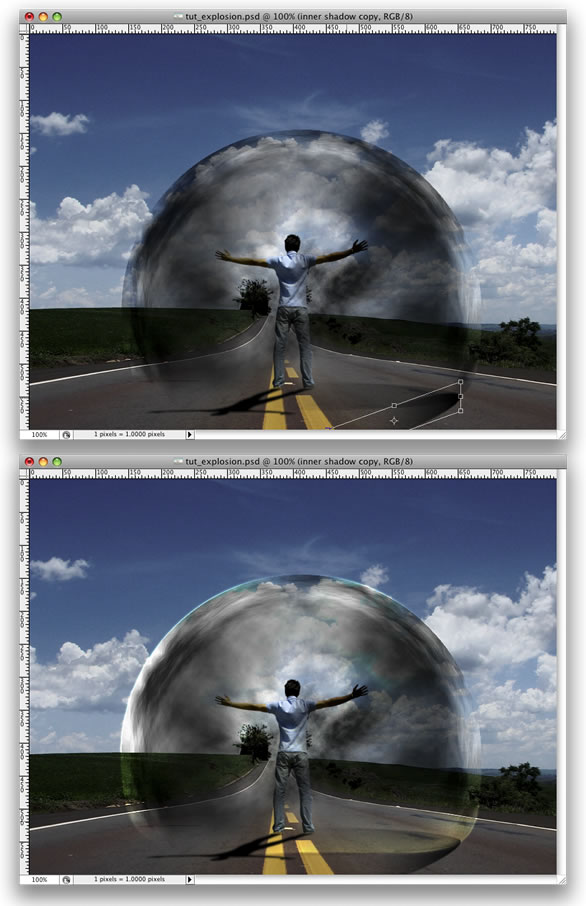
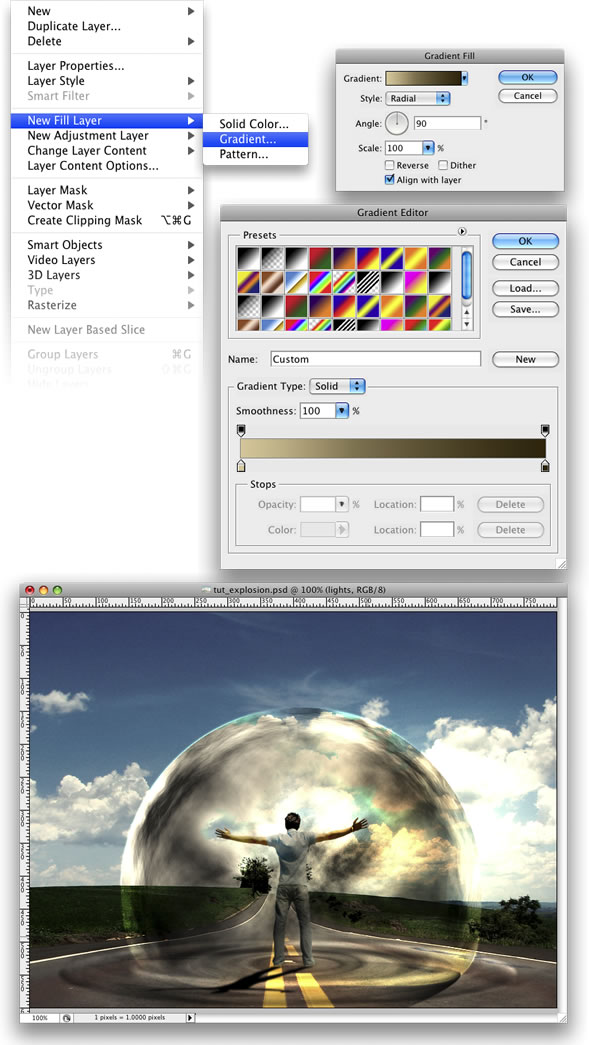
Go to Layer>New Layer Fill>Gradient. Ir a Capa> Nueva capa de relleno> degradado. Use Radial for the Style. El uso de la radial de estilo. For the colors use #ddc396 and #2f1e00. Por el uso de colores # # ddc396 y 2f1e00. Change the Blend mode to Color Dodge. Cambie el modo de mezcla a Color Dodge.
Step 22 Paso 22
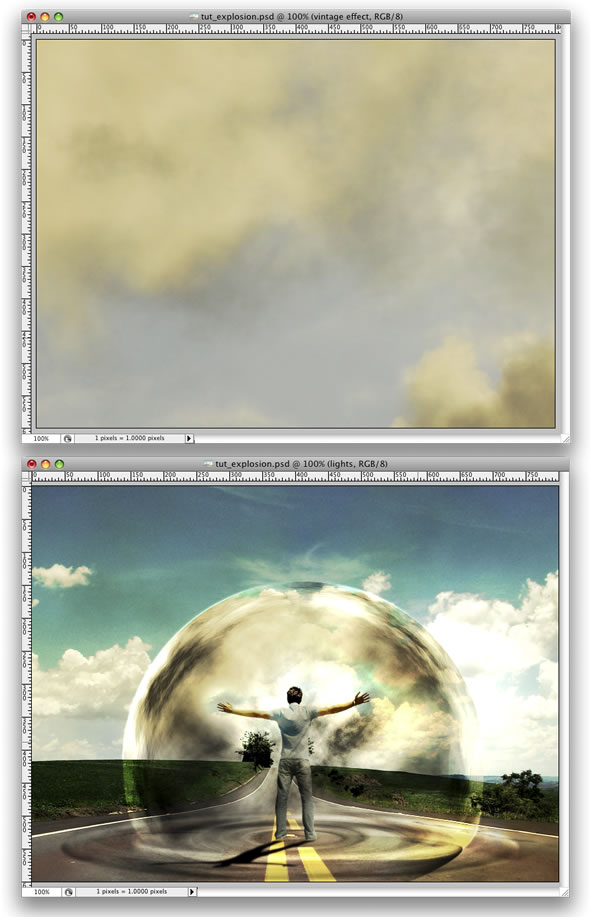
Here I used another image from Stock.Xchng, image . Aquí he utilizado otra imagen de stock.xchng, la imagen. Just place it on top of all layers and change the Blend Mode to Overlay. Sólo tiene que colocar, en la parte superior de todas las capas y cambiar el modo de mezcla de superposición.
Step 23 Paso 23
Now let's make some adjustments. Ahora vamos a hacer algunos ajustes. First, lets darken our Magneto dude a bit more. En primer lugar, permite oscurecer nuestra Magneto dude un poco más. Select the Burn Tool(S) and burn the back of the guy. Seleccione la herramienta de grabación (S) y quemar la parte posterior del chico. After that, change the Blend Mode of the "ripples" layer to Soft Light. Después de eso, cambiar el modo de mezcla de las "ondas" capa a luz suave. You can delete some parts of the clouds as well. Puede eliminar algunas partes de las nubes también.
Step 24 Paso 24
Create a new folder, beneath the "dude" layer. Cree una nueva carpeta, bajo el "dude" capa. Name the group "power" and change the Blend Mode to Color Dodge. Nombre del grupo "poder" y cambiar el modo de mezcla de color para Dodge. After that, create a new layer inside of this group. Después de eso, crear una nueva capa dentro de este grupo. Then using the Brush Tool with white color, create some lights coming from the hands of the guy. Tip: use a regular brush with 0% for the hardness. Luego, utilizando la herramienta Pincel con el color blanco, crear algunas luces procedentes de las manos del hombre. Sugerencia: use un cepillo con 0% de la dureza.
After that you create another layer. Después de que cree otra capa. Use some brushes to add more effects. Utilice algunos pinceles para añadir más efectos. I used some abstract brushes from http://brusheezy.com . He utilizado algunas resumen cepillos de http://brusheezy.com. Then add a Pink Outer Glow Layer Style. A continuación, añadir una rosa Ultraterrestre Glow Layer Style.
Step 25 Paso 25
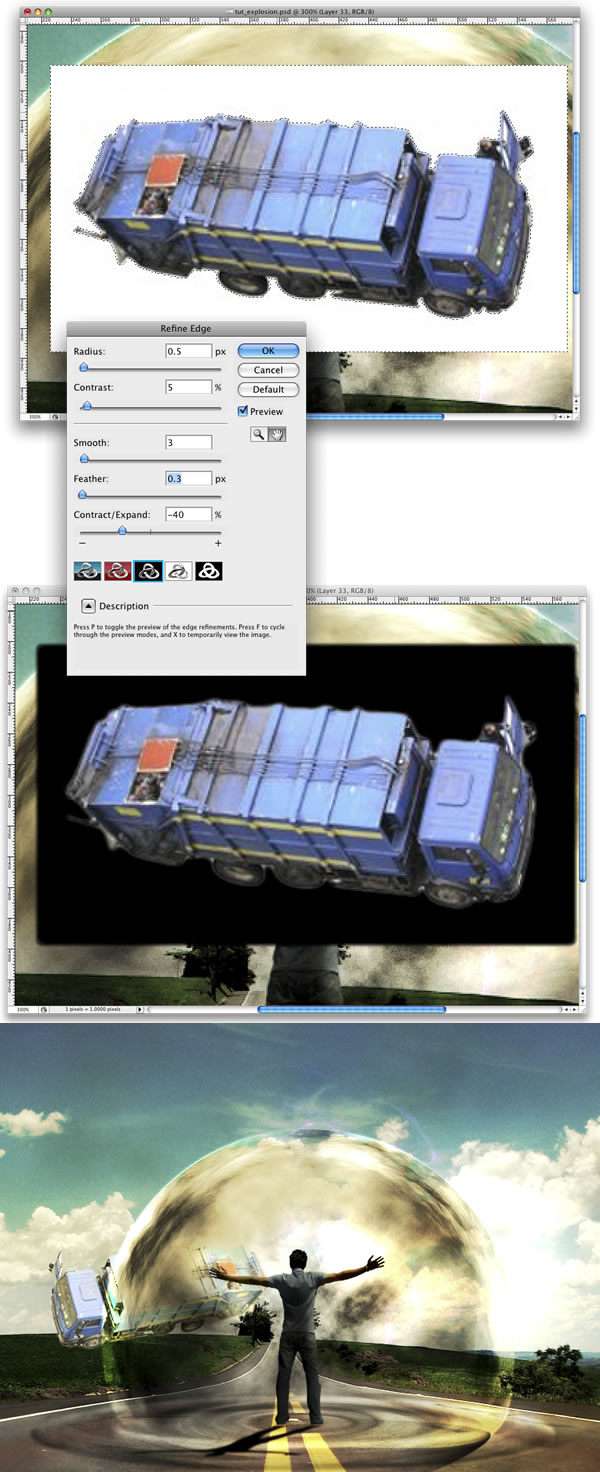
Import the truck image, you can download it at image . La importación de camiones imagen, puede descargarlo en la imagen. Then with the Magic Wand Tool(W) select and delete the background of the photo. Luego, con la herramienta Magic Wand (W) seleccionar y borrar el fondo de la foto. Leave just the truck. Deja sólo el camión. After that go to Edit>Transform>Flip Horizontal. Después de que ir a Edición> Transformar> Voltear horizontal. Move the truck to the side of the road. Mueve el camión al lado de la carretera.
Step 26 Paso 26
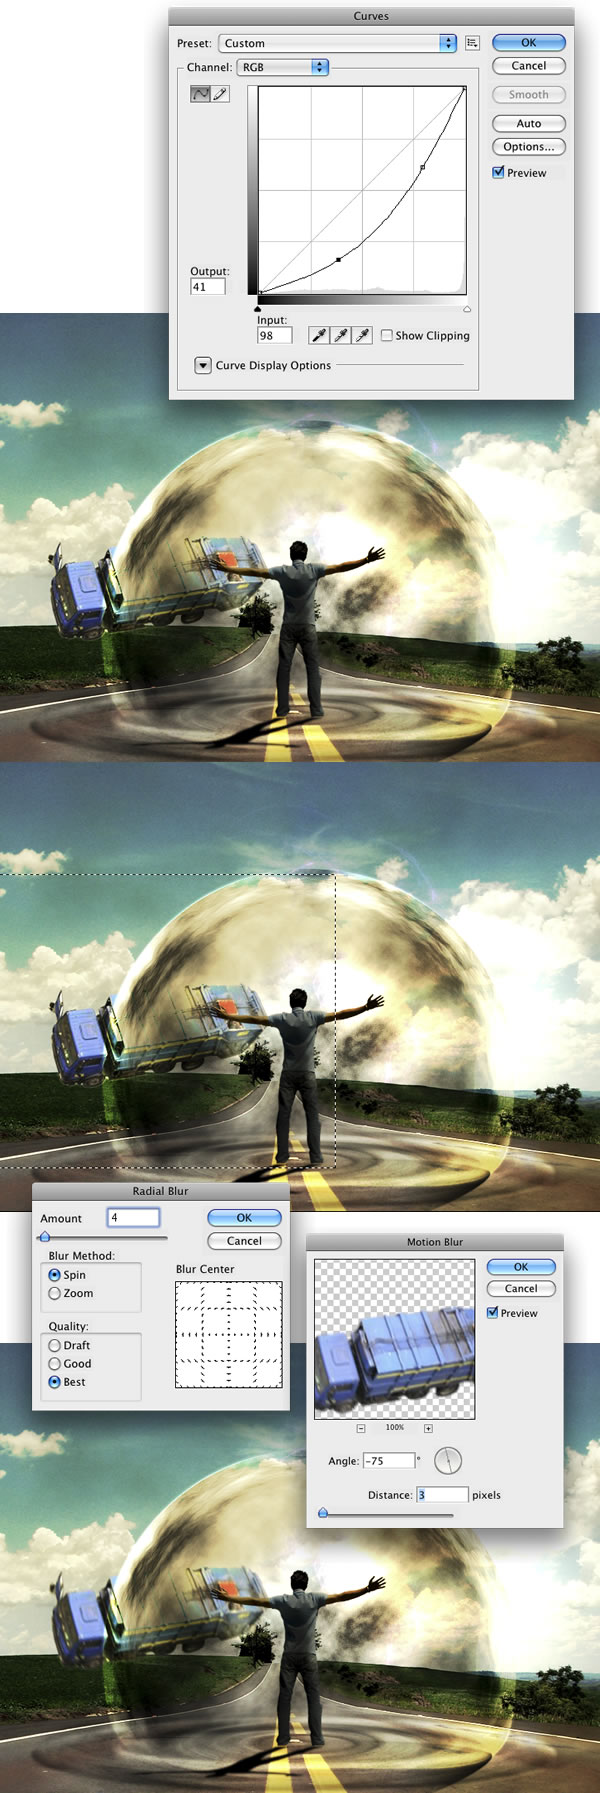
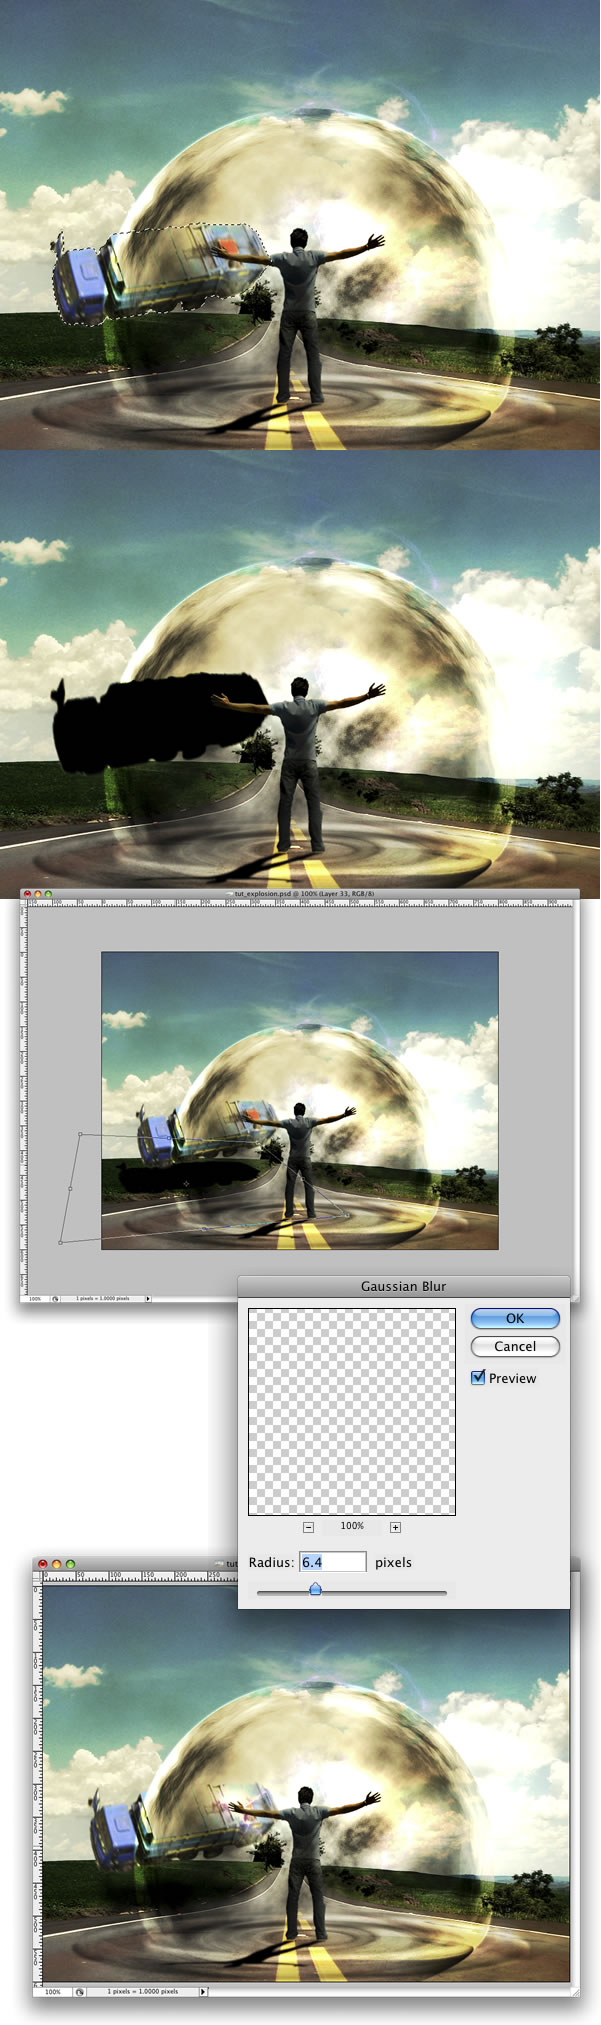
Go to Image>Adjustments>Curves and make the truck a bit darker. Ir a Imagen> Ajustes> Curvas y hacer que el camión un poco más oscuro. After that, using the Rectangular Marquee Tool(M), create a rectangular selection a bit bigger than the truck. Después de eso, utilizando la Rectangular Marquee Tool (M), crear una selección rectangular un poco más grande que el camión. Then go to Filter>Blur>Radial Blur. Luego vaya a Filter> Blur> Radial Blur. For the settings use Amount 2, Method use Spin, and set Best Quality. Para la configuración de 2 Créditos uso, Método Spin uso, y establecer mejor calidad. Next go to Filter>Blur>Motion Blur. Siguiente ir a Filter> Blur> Motion Blur. Then use -75 degrees for the angle and 3 pixels for the Distance. A continuación, utilice -75 grados para el ángulo y 3 píxeles para la distancia.
Paso 27
Now we will create the truck's shadow. Ahora vamos a crear la sombra del camión. To do that select the Truck's layer, click with the right button of the mouse and choose Select Pixels. Para ello seleccione la capa del camión, haga clic con el botón derecho del ratón y elija "Seleccionar Pixeles. Then create a new layer and fill it with black. A continuación, crear una nueva capa y rellenar con negro. Put this layer beneath the truck layer and go to Edit>Transform>Distort. Ponga esta capa debajo de la capa de camiones e ir a Edición> Transformar> distorsionar. Distort the shadow to make it look more real. Distorsionar la sombra para hacerla ver más real. Then go to Filter>Blur>Gaussian Blur. Luego vaya a Filter> Blur> Gaussian Blur. Change the Opacity of this layer to 60%. Cambiar la opacidad de esta capa al 60%.
Step 28 Paso 28
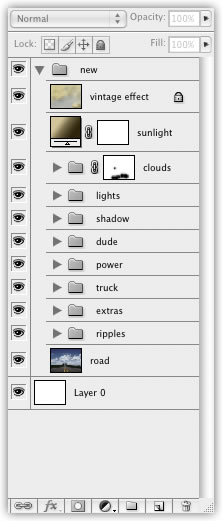
Group the truck and the shadow layer and rename it to "truck." Grupo de los camiones y la sombra capa y cambiar el nombre a "camión". Then organize your folders in the Layers Palette. A continuación, organizar sus carpetas en la paleta Capas.
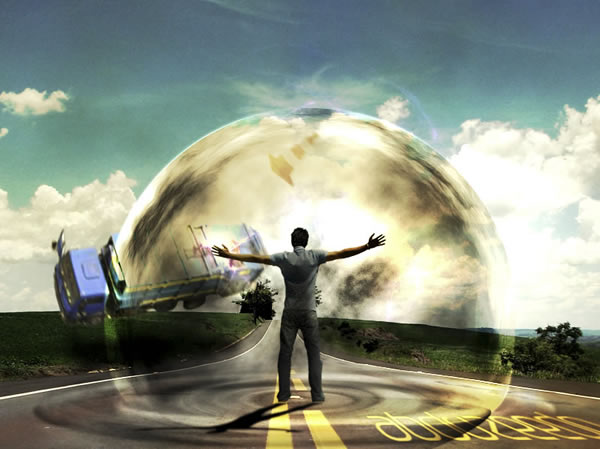
Conclusion Conclusión
You can add more elements to the image, like a traffic cone or more cars. Puede añadir más elementos a la imagen, como un cono de tráfico o más automóviles. But always change the curves in order to make the objects have the same lighting. Pero cambiar las curvas a fin de que los objetos tienen la misma iluminación. That will make the image more realistic. Esto hará que la imagen más realista. For some effects, there will be many other ways to achieve a similar result. Para algunos efectos, habrá muchas otras maneras de lograr un resultado similar. Experiment with different methods of achieving an effect, like we did with the ripples. Experimente con diferentes métodos de lograr un efecto, al igual que hicimos con las ondas. Finally, stick with the ones you think are the best for that image. Por último, palo con los que piensan son los mejores para esa imagen.


0 comentarios:
Publicar un comentario